Thursday, June 25, 2015

Project: Ring Box

Project: RingBox

Inspiration: Online inspiration for ring boxes is all over the place, from traditional pillows to oversize seashells. For mine, I knew I wanted two things: security (particularly if we are going to put the real rings in there as opposed to placeholder ones), and for the rings to look pretty! I found images of rings on moss/natural greenery looked particularly nice, so I decided I'd do a box with some moss inside.


Cost/Materials: The box itself I got for $1 at a craft store. I actually bought a couple different ones since they were so cheap; one option had a magnetic element that held it shut, but I liked the one with the actual hinge lock better. Plus, it looked sort of like a mini treasure-chest, and I thought our ring bearer would like that. The moss is overpriced at crafts stores - buy it elsewhere if you can! I got my bag (pictured) of reindeer moss at Dollar Tree for $1 and there is PLENTY in it to do this and probably some other projects if I think of any.

How I Did It: I used that handy-dandy wood burning tool to put our initials with the letter stamps, then freehanded with the "flow" point the heart, plus sign, and our date. Then I stained it up, added some moss once it was dry, and popped my own ring in to see how it would look

The Outcome: I love it! It didn't come out perfect (e.g., the letters are on slightly different horizontal planes), but I am totally okay with it. It's supposed to have that sort of hand-made, hand-loved look. 

Lessons Learned/Tips: For security, I did add some little eye hooks ($1 for a bag of 20) into the side of the box, so I have the option of tying the rings into it with a ribbon, just in case the box falls and is knocked open. You can get an idea of what that looks like in this picture. It shows a little decorative burlap in the bottom, which I ultimately ended up not going with because the moss looks so. much. cooler.

Also, when I originally tried this project with a different box (the magnetic one, that I ended up not going with), I closed the box after staining it, and it got stuck shut! I was able to pry it open, but be sure not to do something like this, as funny as it might be to see the best man struggle to get the rings out. :)

Would I Do It Again: Yup! Easy, and way cheaper than buying some fancy box online or in a store, plus you'll get to keep it around for ring storage if you need it. (I personally use a metal giraffe figurine ring holder... and I announce "regal giraffe!" roughly half the time when I put my ring on it). 

Friday, June 19, 2015

Project: Bouquet Charms

Project: Bouquet Charms

Inspiration: I knew I wanted some ways to honor our several late grandparents, and I saw the bouquet charm idea online. What I liked most was the idea that they get to "walk down the aisle" with you.


Cost/Materials/How I Did It: I'm going to actually just point you to the blog post that I used to create them! I followed these directions pretty much to a T, using similar products I got at Michael's. I really liked how things turned out with charms by Bead Landing. So, here is a link to the directions, and thank you to Sarah for writing great ones! http://sarahsaving.blogspot.com/2014/01/diy-photo-pendant-for-under-250.html


The Outcome: I'm really pleased with these. They were easy to make, and are the perfect little sentimental detail for my bouquet.

Lessons Learned/Tips: One thing I did a little differently from Sarah was that I didn't use (at least what seemed to be) original photos. I took pictures of the photos I wanted to use, then sent them to my e-mail. I opened them in Picasa (my favorite free photo editing tool), cropped them down to the sizes I would need, and turned them all sepia tone. This way I didn't have to worry about ruining any original photos, and I was able to print all four of my own grandparents for about 7 cents (yes, I couponed to get one 4x6 print at Walgreens).

Would I Do It Again: Yes, and I'll have to soon since I don't have the pictures from my fiance's side yet!


Wednesday, June 17, 2015

Project: Cork Heart

Project: Cork Heart


Inspiration: Images like these online. I really liked the second one, where the colors come naturally from wine. The idea is to save the corks from all the wine served at your wedding and to create it with those. I thought this was awesome, but I'd rather not have one more thing to worry about on the day of the wedding (i.e., "are they collecting the corks?") and another project to do after. I decided to make something beforehand that I could use as a decoration for the ceremony and in our home afterward.


Cost/Materials: Lots of corks, to start! If you have a huge collection of corks, that's great. If you don't, buy 'em cheap. I got a bag of 100 at Michaels. They were originally $20, but I waited until they went on sale and used a coupon, so I think I got them for around $7. I then doubled the amount of corks by cutting them all in half, because the "height" of them didn't really matter to me for this project. You also need some acrylic paint in whatever color(s) you want, and I'd recommend laying out newspaper or paper towels since corks might tip over on your workspace as they're drying. Lastly, you need a canvas or whatever surface you want to create the art on, and a hot glue gun. I got an inexpensive burlap canvas, but I think this would also look great on a standard white painting canvas to really help the letters pop.

How I Did It: First thing I did after cutting the corks in half was to put them in the basic heart shape. Then I was able to more accurately make decisions as I sectioned off how many would be in the truest yellow, how many in the yellow with a tiny bit of pink, equal parts pink and yellow, etc., until I got all the way up to the true coral pink. I only used two acrylic paints to create all these colors; just experiment with mixing! I did this on plastic plates with a plastic fork so I could dispose of the mess easily after. I starting dipping the corks in, patting them off a little on a paper towel if they picked up too much paint, and then putting them upright to dry. After they were dry (overnight), I arranged them on the canvas. This was a big old pain. I'm not sure how the people who created the ones in my inspiration pictures did it, but I was not able to get them to all smush together and look good, so I decided to space them out, somewhat evenly, into the heart shape. I hot glued them down, making sure to get plenty of glue on the whole backside of the cork, although not too much so that it was oozing out the sides when pressed down. Once this was all done I painted a phrase at the bottom. It took some patience to get the painting clear because the burlap was such a rough surface. Since it was dark, I also wasn't really able to pencil the writing on beforehand and then paint over it. Free-handing it was rough. If anyone knows how I could have better transferred the words before painting them, let me know!


The Outcome: I am happy with it. Like I mentioned above, I wish the writing was a little better, but what can you do... I took a risk!

Lessons Learned/Tips: I'd recommend white canvas for the back, if only to make it easier to stencil your plan onto the background before gluing/painting.

Would I Do It Again: I have plenty of corks leftover to maybe make something similar in the future, and it was simple enough! I'd maybe simplify even more by just doing a paper background within a shadow box or something like that. We'll see!

Check out my mom, helping me crank things out, burning the midnight oil! Thanks, Momma!


Project: Cork Letter Banners

Project: Cork Letter Banners

Inspiration: I loved the quote and general look of this "We've Decided on Forever" banner, found somewhere in the Pinterest-verse. I knew I'd try to make something, but wasn't sure how. Enter, cork:


Cost/Materials: I knew when I saw them on a shelf at Michaels that I wanted to try using these cork letters to make our banner. They are significantly smaller than the ones in the picture that inspired me, but I liked their natural look and that they would be easy (in theory) to string together. The box costs about $5, but even less if you extreme coupon like I do. I got them when they were on sale 50% off, which happens every so often for the "Natural Threads" collection they are a part of. Then I got a bit of clear jewelry string (I'm not actually sure what it's called, but it looks like imitation sinew/fishing line) for 99 cents. My recommendation is that you can probably find something cheap but still sufficiently strong. I also used sewing needles and pliers (necessary if you have delicate hands like mine). Optionally, you can also use some faux flowers to add a little extra something.


How I Did It: I started writing out some phrases, beginning with "We've decided on forever," then threaded a needle with the clear string. I put the needle into one side of the letter, about 3/4 of a centimeter down from the top of the letter, and did my best to keep it going straight through without it popping out the other end too far to one side or the other. Basically you want to make sure it's going to be secure, such that if the letter was tugged on it wouldn't fall off the line. As you put your phrase together, you want to make sure you're doing the letters in order and all facing the same direction. Each time I added one I pulled it a little further down the line to be sure the way I put it on matched up with the other letters. It's not difficult, but you're better safe than sorry! The toughest part about this was working the needle through some of the letters. Most of them weren't too tough, but some you really had to push, and pushing on the end of a needle doesn't work out well for flesh, so I started using a pair of pliers. Start the needle in where you want it, then use the pliers to push it as far as you can until it starts coming out the other end, then grab the part that is coming out with the pliers and pull it the rest of the way through. This honestly was tough for me, but I also have the hands of a child.

The last thing I did was connect a few letter "U" pieces together and superglued some faux flowers to them, then strung the piece through the cork as a little extra decoration at the end of the phrase. I think it makes it look a little more romantic.

To have it ready for hanging, I was sure to leave plenty of the string on either end. My hope is our venue will have something we can either tie it to, or will allow us to use non-damaging 3M command hooks that a little loop of the string could be hung onto. We'll see what happens! I'm storing it hanging across a curtain rod so it doesn't get tangled up or warped.

The Outcome: I like it! The letters can be adjusted after they're on; the cork holds onto the string pretty tightly assuming you've used a small enough needle, so they have just the right balance of being adjustable but staying in place once you get them where you want them. Here is the main one I talked about, plus a photobooth directional sign I made while I was at it.


Lessons Learned/Tips
: I tried painting the letters in our colors with acrylic paint, but it honestly didn't come out all that well. Just a heads up. It looked patchy and uneven so I definitely preferred them au naturale.

Also, because I'm a generally a stickler for grammar, I wasn't going to go without an apostrophe in the contraction ("we've"). I made this by cutting off part of an X since I figured it wasn't a letter I'd use many of. I actually cut it with the handy dandy wood burning tool I talked about in the last post. Cutting cork with scissors leaves a really uneven edge, but using the "exaco" type accessory on a heat tool lets you get a smooth finish. I also used it to do surgery on a few letters (turning Q into O, etc.) and creating an arrow for the photobooth sign.

Would I Do It Again: Sure. I bought a bunch of the boxes of letters so I can craft future things with them, not necessarily all banners. They're cheap, and I think they make a pretty bold statement.


Monday, June 15, 2015

Project: Sweetheart Chair Decor

Project: Sweetheart Chair Decor

Inspiration: I saw a lot of images online with things like "I'm his Mrs."/"I'm her Mr." or something else cutesy (see examples) and the one that made me smile was the one with The Proclaimers lyrics from "I Will Be" - the "I would walk 500 miles... and I would walk 500 more" super catchy tune (and one that's very familiar to fans of TV show How I Met Your Mother). It grows on you. And it's sweet!


Cost/Materials
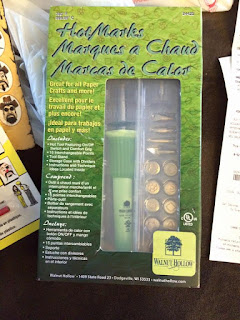
: Rather than painting/chalking the signs, I wanted to keep with our "natural" looking materials like wood and cork, so I decided I would woodburn this one. This and all the other woodburning projects I did were the result of investing in a woodburning tool. Walnut Hollow has several good starter tools, including this one as well as some that are cheaper. I went for this one (about $35, but I got it half off using a coupon for closer to $17) because it had a heart shaped stamp tip as an accessory. For me, investing in the tool was worth it because I had a couple different projects in mind when I got it. My first time around, I tried just free-writing with what I believe they call a "flow tip," but wood is grainy and uneven and it makes it really hard to write smoothly, at least if you're new to using the tool, so I decided after my first failed attempt that I would invest in the attachable letter stamps. As you can see, they can run you a pretty penny. I got mine using Amazon prime instead, and paid only $14 total. The wooden hearts I used were from AC Moore, though they do carry similar ones at Michaels. They cost about $1.50 a piece, which is good news, because I messed this project up several times and am glad buying new materials didn't cost too much. I also used wood stain (a super old can that hadn't been touched in a decade that I snagged from my parents' basement), a small sanding block, and some pliers (to change out the tips of the heat tool without having to wait for it to cool down). You will want to make sure you have a surface to put the hot letter stamps on while they cool; I used a kitchen oven mitt.


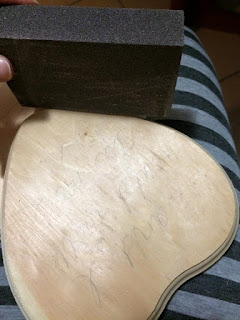
How I Did It: I placed the letters out for what I wanted to write, and moved them around until the spacing looked good. Then I knew how many lines it would take, so I evenly spaced the horizontal lines to make sure things would be aesthetically pleasing and not slant in any wrong directions. Next I spaced out exactly where each letter would rest on the lines; you can probably see the little notches along the lines, and maybe the faint scribble of letters written in pencil. This was so as I changed out the tip of the heat tool, I'd know exactly where to stamp each letter and could get all instances of the same letter on both hearts done in one fell swoop. Once I was done, I erased all the pencil marks. One thing that takes getting used to is determining how long to press the letters down. I found that if you've let them heat up for about a minute before stamping it on the wood, it only takes about six seconds of pressing to get a good mark. If you hold it down longer the letters are more "burnt" and then look more black. I liked the natural variation my inexperience gave to the letters.


There were a few times when I really held the letter down for too long, though, which resulted in a burnt area beyond just the letter. This was relatively easy to fix up with just a little bit of sanding.  Once it was all cleaned up and looking good, I thought it looked a little... boring. I remembered that heart stamp that came with the kit and decided I'd like to do some little flowy designs with it. I entrusted that task to my mom, because #delegation. Then I stained them up!

The Outcome: Pretty sweet! I am not sure yet whether we will actually hang them from the back of our chairs, because, as my smart cookie fiance pointed out, no one is really going to see the backs of our chairs because of how the sweetheart table gets placed in our venue. So maybe they'll be used elsewhere, but they are certainly cute regardless!


Lessons Learned/Tips: (1) Free-handing takes practice. My first attempt sure wasn't pretty; stamped letters were the way to go. (2) Make sure you've run your penciled design by someone before you put the tool to the wood. I wrote out "I would walk 5,000 miles" the first time around, when the lyric is really five hundred miles. On the second time around, I wrote the same lyrics on both the hearts, when the second one should be "And I would walk 500 more" so that was a bummer. Totally could have been avoided if I had just slowed down and had someone check. (3) This is common sense for most, but I also messed up the wood stain the first time that I got around to that step. As I mentioned, I grabbed some wood stain from my parents' basement. I got a couple jars, and it ends up the first one I went with was actually more of a weatherproof sealant without much color to it... silly me, I put it on thinking the color (white) would deepen/bring out the natural tones of the wood as it dried. This is not the case. You want wood stain that looks like it's going to stain wood. Embarrassing! Not only had I not stained it, but I had waterproofed it which kept it from being stained after. Not even standing fixed that. Super frustrating! My fiance will probably not let me live that one down.


Would I Do It Again: I can't imagine doing this exact project over again, because it took three takes and a whole lot of frustration to finish it. As you can see, I took some of my frustration out by testing stamp letters on one of the failed attempts. That being said, I do like using the woodburning tool, and now that I have a good handle on it I can see myself trying other stuff with it going forward. I'd say this project isn't for the total novice crafter, if only because of how much patience you need for it.

Monday, June 8, 2015

Project: Card Box

Project: Card Box

Inspiration: I knew I wanted to have a card box because I think it really helps guests feel confident about what to do with cards (which often contain valuable, envelope-sized gifts). When attending weddings I know I've felt better when there was somewhere that seemed a little safer than just laying the card on a table. So, I saw some cute ones online, and cute ones in stores. No surprise at this point that they were expensive, so DIY it was!


Cost/MaterialsAt the very least, you need some boxes and materials to decorate with. Since you can design it however you want, the budget is really in your hands. The boxes can be covered up entirely, so there is plenty of opportunity for upcycling old shoeboxes, etc. I bought a set of nested paper mache ("papier-mâché" if you want to get fancy) boxes at Michaels when they were on sale for about $10, because to me it was worth it to have them perfectly sized and in a natural color. For decor I had some rolls of burlap I got at the fabric/craft section Walmart that had coral chevron painted on them. I didn't want to go very burlap crazy with my decorations, but they were inexpensive and the color was just what I was going for. The rolls are about 10 yards and cost about $3 a piece. They seem to have a large collection of them in different widths with different colors and patterns (including polka dots, lace, etc.) that are priced much lower than at crafts stores or anywhere the word "wedding" allows it to be marked up. You should also have a glue gun or another plan for creating a pretty permanent adhesive to keep everything together, an exacto knife for cutting the card "entrance" spot, plus anything else you want to decorate it with. I used a handful of wood chip hearts that I found in the basement that were mixed in with craft supplies from when we were kids and painted them in the wedding colors. The perfect touch that I just happened across in Hobby Lobby was a little paper mache mailbox ($1 at regular price for the size I got). They have them in all kinds of sizes, but I liked this tiny one to put atop my boxes to make sure it was clear what the box was for. And just to be super sure, I also labeled it "CARDS" with cork letters I had leftover from another project that I'll post about soon. The cork letters are from Michaels in the Natural Threads collection and I love them! The last thing I used was scrap pieces of paper in our colors to make the fake "love letters" and to emphasize where we had cut the hole for cards.


How I Did It: The first thing to do is make a plan for the structure: decide where the card hole will go and whether you want the boxes stacked evenly versus on angles, etc. Next, cut the appropriate holes. For me, having three boxes, I decided the middle one would have the card entrance and the cards would fall from there into the bottom box, so I cut three holes: one for the cards to enter on the side of the middle box, one large hole in the bottom of the middle box to let the cards fall down, and the third was in the top piece for the largest box (again, to let the cards make their way to the bottom). Measure these out and mark them off with a pencil before cutting so you can ensure that you like the size/location. You'll also want to make sure you don't cut the holes between the boxes too large, or you could risk ruining the structural integrity of the middle box, or making the large box's hole so big that the middle box falls in! Measure twice, cut once! That's a thing, right? Next I added the burlap. As you can see in the first picture in this section, I overlayed the burlap on the part with the card entrance so that I would know how much of the burlap to cut out before gluing it on. I didn't worry about the pencil lines I made or cutting it perfectly, because I knew I was going to cover up any messiness later on. By keeping the burlap pulled taught, I was able to put the glue on only two places on each box: first, I put it all along the top of the inside of the boxes, and folded the fabric in, and then I put it along the outside corner edge where the cut ends of the fabric met. Other than that, I did not glue anywhere along the outside of the box, because I didn't want to risk creating any lumpy areas. When this was done and dry, I cut a piece of yellow scrap paper into a hollow rectangle and added it over the card entrance, to make it easy to see. (mom's idea - she's a genius). I then painted up the mailbox in our colors, let it dry, and stuffed in some fake "love letters" (pieces of patterned scrap book paper that I just folded up and stuck inside). For the hearts, I wanted it to look like they were naturally spilling out of the mailbox. To try it out, the first thing I did was just drop the hearts all over, letting them spill out of my hand and seeing where they naturally fell. Next I made some little tweaks here and there, and I started gluing them down to recreate the look. The reason I glued them is because I want to be sure no one needs to worry about setting up the hearts or anything like that on the day of the wedding, or worry about knocking them off or losing some in transport. They're pretty secure. The "CARDS" was made by stringing some clear jewelry thread through the letters and hot gluing to ensure it would stay; more on the cork letters in a future post.


The Outcome: Pretty cute, right? I didn't glue all the boxes to each other yet because I wanted to be able to nest them a bit for storage since the big day is over a year away, but I will hot glue them to each other when we are closer.


Lessons Learned/Tips: One thing I wish I'd done was to maybe pull the burlap around the bottoms of each of the boxes instead of it being flush. Part of the reason I did it the way I did was because it would be easier and stay more flush to the corners, etc., but I think it looks a little messy. Just something for thought. Also, I originally tried to do this on a spare wood box (see photo). It just wasn't coming out how I wanted. Might be nice for something more rustic, but I tried to make it without much planning and I didn't like the way the paint came out. There's a lesson for you - no impulsive late night crafting... it never turns out as good as you think it might. Do projects when you have the energy to go through each step nice and slowly so that you don't end up wasting materials because you messed up while you were rushing!


Would I Do It Again: Yeah! And I think I'd maybe get a slightly bigger version of the paper mache mailbox... it's just so cute, I think I'd showcase it a little more if I made this a second time around.


Friday, June 5, 2015

Project: Boutonnieres

Project: Boutonnieres

Inspiration: I wanted to craft the boutonnieres myself if I could for a few reasons: (1) I don't care that much about having fresh flowers for everything, (2) flowers are expensive, (3) I think boutonnieres are silly and heavy roses drooping because the little pin can't hold them up just looks sad, (4) since our wedding is in July, it's going to be hot out and the guys will only have their jackets on for a very short time. I didn't get inspiration from any particular image online, more just kept visiting the mini florals section in craft stores until something showed up that I liked (the mini calla lilies).


Cost/Materials: Over all, making the boutonnieres saved me a lot of money. Figuring a real rose one costs about $8-10 from the florist, and that's what I spent in TOTAL on making a dozen of these, it was a slam dunk in terms of saving. I also like that it is one fewer thing to worry about picking up from a vendor/not accidentally leaving in the fridge (per every prom I've been to) on the day of the wedding, because these are now safely packaged away until the big day. The faux calla lilies were 99 cents per bundle of six, leaves were 99 centers per bundle of ten, the coral/yellow sprays were $1.49 per bundle of six, and the floral tape I got a bunch of rolls of for 19 cents each (yes, 19 cents) during a warehouse closing sale from the sunshinecrafts.com site. Also pictured: washi tape purchased on clearance and ribbon that cost about 50 cents a spool. I thought I might tape the bottoms with these but ended up not going with it and just kept the floral tape exposed.

How I Did It: I pulled apart the mini callas into sets of three and then arranged them until I thought they looked aesthetically pleasing (usually close to each other, but on different levels in height), then popped two of the leaves and a tulle spray behind them. Take your time on this part to make sure you like where everything is placed; you can do some adjusting after you tape, but not a whole lot. After I was happy with how it looked, I gently twisted all the wired bottoms together, and then folded them in half, doubled-up on itself, which resulted in a shorter and sturdier "stem" (see picture). After that I wrapped the floral tape, typically staring at the very top where everything came together and then working my way down the stem to the bottom (making sure to cover the very end) and then back up. I usually wrapped it around the top area again a few times to be sure everything was very secure before tearing the tape off.

The Outcome: Cute, right? I'm pretty pleased.


Lessons Learned/Tips: Like I mentioned above, I tried wrapping colored ribbon around the bottom to tie it in more with the colors. I ended up just liking the exposed floral tape more. Also to note, if you haven't worked with floral tape before, it will take a little getting used to. It doesn't seem very tacky when you touch it, but it sticks to itself incredibly well. Don't be afraid to pull it tight, especially working on faux flowers.

Would I Do It Again: Yes, yes, yes! I suppose we'll have to see how they perform on the day of to really know, but my fiance likes them a lot and I like them, so that's really all that matters... they're just a very small detail of the day.


Update: They looked just fine at the wedding! And boy was I glad I didn't need to make boutonnieres when I was done with all the other flower stuff we did! [Photos below by Danyel Stapleton]